
So, you want to grow areca palms and enjoy the long, green fronds of this tall, gentle giant.
Did you know these plants can grow up to 30 feet tall?
They can brighten up any room in the house, and can even be grown outdoors in containers (or in the soil).
Add some tropical paradise to your home.

They’re found in shopping malls, parking lots, and even office settings. It’s the plant that was always there but you never paid attention to.
With their graceful and bountiful leaflets, they can add some color to your house.
Easy to care for, low maintenance, and doesn’t even need plant food- they’re a beginner-friendly indoor palm that asks for a little and rewards you with a lot.
So, let’s dive in and see what these gorgeous palms are all about!
Guide Contents
Quick care guide: Areca palms
| Plant type | Perennial |
| Origin | Madagascar |
| Scientific name | Dypsis lutescens |
| Other names | Bamboo palm, butterfly palm, yellow palm, golden cane palm |
| Soil type | Well-draining, organic, high quality |
| Soil pH | 5-6 (slightly acidic) |
| Sunlight requirement | Bright, indirect sunlight |
| Bloom season | Spring, summer, fall (growing seasons only, doesn’t bloom) |
| Colors | Green, white, yellow |
| Max height | 30 feet |
| Max width | 3 feet |
| Low temperature | 40F |
| High temperature | 70F |
| Ideal temperature range | 50-60F |
| Humidity | High (50%) |
| Watering requirements | Often during first year of growth, spring, and summer |
| Fertilizer requirements | Low to none |
| Fertilizer NPK | 12-4-12 |
| Days until germination | 2-3 weeks |
| Days until bloom | 1-2 years |
| Speed of growth | Moderate |
| Hardiness zones | 8, 9, 10, 11 |
| Plant depth | 2-3 inches |
| Plant spacing | 3-6 feet |
| Propagation | Seed, division, transplant |
| Common pests | Caterpillars, thrips, scale, mealybugs, spider mites |
| Common diseases | Root rot, bulb rot, powdery mildew, anthracnose, graphiola, botrytis, anthracnose, cercospora, pink mold |
| Indoor plant | Yes |
| Outdoor plant | Yes |
| Grown in container | Yes |
| Flowering plant | No |
| Beginner friendly | Yes |
| Care level | Low |
| Uses | Decoration, color, centerpiece, pathing, bordering, background plant, foreground plant, indoor plant, privacy hedge, indoor decor |
So, what exactly is areca palm?
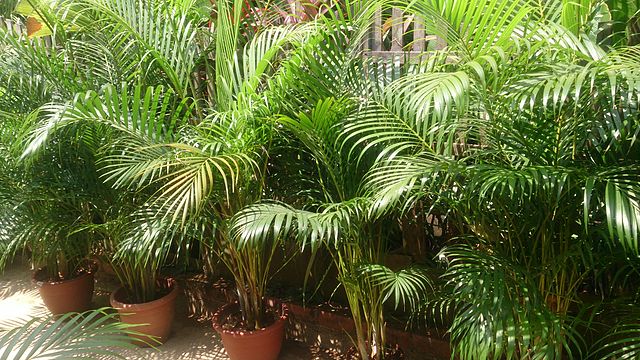
Areca palm (pronounced like “uh-ree-ka” palm) is a dense-leafed palm that’s commonly grown indoors.
Also known as butterfly palm, yellow palm, bamboo palm, Dypsis lutescens, and golden cane, this is a popular choice for an indoor palm plant due to its low maintenance and gorgeous foliage.
Plus, the portability of it makes it easy to move around to get enough light. The leaves are light to dark green with a fan-shaped growth pattern.
Each stem is broad and fan-shaped with pairs of leaflets that span out in a broad pattern. There are about 40 pairs of leaflets that alternate on the narrow, thin stem which gives it an overall feathery look.
Larger, older branches have up to 60 pairs of these leaflets, giving areca its signature look.
Perfect for room decor or to brighten up the place.
Origins
Areca palm is native to the subtropics and tropics all over the world.
Some of them can be huge and prefer acidic soil near the ocean or sea.
They’re known for their roots in Madagascar, which houses all sorts of exotic plants.
How to care for Areca palms
This part of the guide covers the basics of areca palm care. If you’re starting from scratch, I’ve got you covered. Read on to learn everything you need to know.
Here are some steps to plant and care for areca palm in your home.
You’ll see that this palm is relatively low maintenance and easy to care for compared to most other palms.
So you’ll be glad to know that you can enjoy the greenery from this plant without having to waste a bunch of time on care.
Depending on the strain you’re growing, care may vary. But they’re all generally similar in care.
Choose the right hardiness zone
This is the biggest indicator of success.
If you’re trying to grow areca in the wrong zone, you’ll have a tougher time compared to someone growing in their proper zone. While you can grow it out of your zone, it’s a lot easier to choose the right cultivar suitable for your hardiness zone.
Areca palm grows best in zones 8, 9, 10, and 11. If you’re in zone 10 or higher, you can plant them outdoors in the soil and they’ll grow to their max height (up to 30 feet!).
The mild winters and warm summers will help them grow in their natural environment.
If you’re in a lower zone, you can still keep the plant indoors. Or you can switch between outdoors and indoors depending on the season.
Grow them in the sun during the spring, summer, and fall. Then bring them in during the cold season. This will give them exposure to the natural sun (remember to keep it partial sun) and also overwinter them safely in a temperature-controlled environment.
Areca palm propagation
There are three ways to propagate this palm. You can either transplant it or start from seed, whichever one suits your experience level.
Starting from seed takes a lot of patience because you’re starting from nothing and isn’t recommended for beginners.
Transplanting is easy because the plant already has a head start and you can enjoy it right when you bring it home from the store.
Starting from transplant
This is the preferred method of starting because it’s much quicker and efficient compared to starting from seed.
When you buy a palm at the nursery and bring it home, that’s considered a transplant. You’re going to move it to the container you prepared- not leave it in the one from the store.
Commercial pots are made for growing smaller areca palms, so they don’t always provide enough space for the roots.
Sometimes, you may even bring home an areca palm that’s already outgrowing its container. These are not meant to be its permanent home.
Transplanting is easy- try to keep all the variables the same as the original container to reduce transplant shock. You can use a soil meter to get the metrics if needed.
The only difference should be that it’s getting a new home with higher quality soil.
Remove the plant from its container by uprooting it from the soil. You can water it to loosen the soil and root system.
Turn the container on its side and slide the entire plant out. The roots and stems should be intact into one tangled mess. Leave it be.
Gently place the new plant into the soil in its new home. Give it a good watering to create water pathways and let it drain.
Starting from cuttings (division)
Propagation through division can be achieved easily and is the most straightforward method out of the three.
You’ll need a friend or neighbor (or last year’s generation) to cut out a new areca palm from. The best time to divide areca is early in the spring, as this is when the plant is ready to forge new growth.
Avoid cutting in the summer or fall because the plant may still be growing roots or foliage in preparation for the wintertime.
To divide, gently uproot the host plant. It should be healthy and fully developed with a few years of growth under its belt. The plant should be removed from the container and then watered to loosen the soil and roots.
Locate a clump of 3 stems and use a sterile knife to cut the stems. It should be a clean cut.
Use rubbing alcohol to sterilize the knife so you don’t introduce bacteria to the exposed roots. When you cut the stems apart, be careful to not cut the roots.
The newly divided palm can be moved to its container. It should have a few steps and a tangle of light brown roots. This is all that you need. Propagation complete.
Water it generously for the first time to establish water pathways in the soil of your choice.
Starting from seed
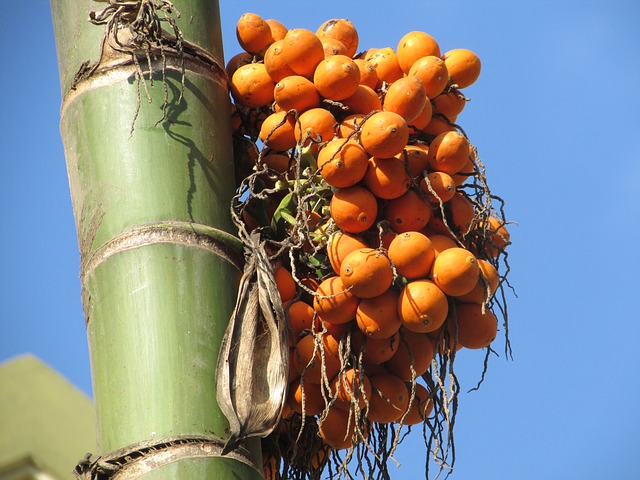
I’d only suggest starting from seed for people who have a lot of patience and some experience on their belt. This process takes very long and requires some more complex techniques.
The seeds can’t be just tossed into the soil and then expected to sprout (only if). This palm is a bit needier and will require some additional steps compared to the traditional plant.
The orange-colored seeds can be planted at a uniform depth. Avoid using green seeds, which are newer and will have a lower germination rate.
First, planting from seeds will take up to 2 months before you see any germination. The germination time is about 6-8 weeks on average and this is only for the seedling.
After that, the plant will slowly grow and you should expect to nurture it for years before you get that dense look from areca palms. This is a slow-growing indoor plant that’ll take some time before it reaches a few feet in height.
You can expect to wait 1-3 years depending on conditions like sunlight, water, fertilizer, humidity, and temperature for the areca to grow 3 feet in height.
So yes, it will test your patience. Germination will occur when temperatures in the soil are above 80F with high humidity.
Other than that, the seeds themselves MAY require you to do some extra steps to maximize your chance of germination.
After all, you don’t want to sit there for 8 weeks only to see nothing pop out of the soil, right? You want to get the highest chance of germination you can.
This varies if you’re starting from fresh seeds or packet seeds.
Fresh seeds that have just been collected from an areca palm can be planted immediately. They’re good to go. Continue to the next section of this guide.
Otherwise, packet seeds or dried seeds will require them to be scarred. This is the process of rubbing them against a coarse surface to scrape and tear them up.
You can use any gritty substance like sandpaper, mesh, or even rocks.
After you’ve given them a good rubbing, they need to be soaked in water with a bit of vinegar for at most 12 hours. Then drain the solution and soak them in fresh water for 12 hours.
Here’s a video that shows the process of prepping areca seeds:
The timing may vary depending on your specific cultivar or strain you’re growing.
Choosing a container
Your container is going to be the home for your areca palm for the next few years until it outgrows it.
Choose a container that’s wide, but not too wide, as the roots will need room to expand but being root-bound may help plant growth.
Containers come in a variety of different materials and designs.
There’s too much to talk about here so I’ll keep it simple: Choose a material that looks good in your home, but also easy to work with.
If you go with something like heavy metal, it’ll be extremely bulky to lug around and possibly even damage your tile.
On the other hand, if you choose a cheap lightweight container like plastic, it’s easy to work with but may not look the best.
Start with at least an 8” diameter and 12” deep planter. This should be good for starting with a single seed or a small transplant.
Make sure that the water drainage holes are present. You’ll want multiple drainage holes so if one gets clogged, the water can reroute to others and prevent waterlogging.
Areca palms don’t like wet feet. Their root systems should be moist, but not drowned with water.
How many can you plant in a single container?
Expert growers at nurseries put 4 seeds in a single 12” diameter container.
This will maximize the space efficiency and create a fuller plant. You can repeat the process at home to get the same fuller look.
Where to place your areca palm
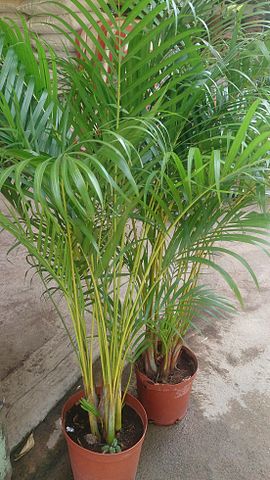
The ideal location should have plenty of bright, indirect light. They need 6-8 hours of indirect sunlight per day, so a west or south-facing window should do the trick.
The palm doesn’t tolerate bright direct full sun as it’ll burn the foliage and you’ll get those infamous brown or yellow tips. This is plant burn or poor nutrient profile in the soil.
Look for somewhere in your house that doesn’t fluctuate in temperature or humidity either.
They appreciate stable temps in the warmer range with humidity levels between 40-60%, which is the average household level.
Avoid placing the container near drafts, doors, windy windows, vents, HVAC units, radiators, or other sources of artificial heat/cold or humidity contributors.
Soil type
The soil should be high quality, palm soil. Many brands make soil just for palms. If you can’t find one, look for a cactus or succulent soil. Citrus fruit soil also works.
The soil should be slightly acidic, well-draining, and loose. Areca palms aren’t too picky about the substrate and they’ll adapt, so mistakes will be forgiven.
Get the best soil possible and you’ll get larger leaves with more leaflets.
Slightly acidic soil means a pH of 5-6. The plant should be watered plenty when it’s young and less when it gets established with firm roots. Use the top 1-2 inches of soil to gauge watering.
Add peat moss or sand (or both). This can help improve soil drainage and keep it acidic.
Sunlight
Areca palms need bright, indirect light. Sunlight that streams through a window is too bright.
Don’t let the light directly shine on your plant’s foliage. The light should bounce off the room and then scatter so the areca plant can pick it up.
That’s good enough for UV light. If you notice burning or yellowing of the foliage, the plant may be being burnt from sunlight coming into the environment.
Consider relocating it. Check to see if the burning stops.
Fertilizer
Areca can benefit from some plant foods, but most should be avoided.
They’re not too hardy against nutrient buildup in the soil, just like how their water needs to be free of additives and compounds. You can use some liquid plant food a few times throughout the spring and summer. Look for an NPK of 12-4-12 with low phosphates. Don’t overdo it.
If you see spots or browning of the tips, stop fertilizing your plant for the rest of the season. Use as directed. You may want to half the concentration or add double the water to dilute it.
Avoid using any plant food during the winter dormancy period. These palms can do well without any plant food at all, so it’s optional only if you have soil that lacks nutrients.
Temperature
Areca palm should be kept between 70F to 85F for ideal growth.
This range suits the subtropical palm best to its native environment. Keep temps above 60F at the lowest during cold nights.
Since it’s indoors, this shouldn’t be an issue. But If you’re keeping it outside, consider moving it indoors or put it into a greenhouse during the winter nights.
You can also use a plant cover if you’re growing areca in the soil and it’s immobile. Areca palms don’t tolerate temperature fluctuations, so avoid them when possible. Place the plant somewhere that doesn’t have wide temperature swings during the day/night photoperiod.
Try to avoid temp drops or sudden swings. Cold drafts can lead to browning of the leaves.
Humidity
High humidity is the natural environment for these palms. If you’re growing indoors, it can be pretty hard to keep the ideal humidity levels, especially during the winter when the heater or HVAC is running that dries out the indoor humidity.
Give your areca palms a spritz of diluted water once a day. Mist the leaves or place the plant on a humidity tray to keep levels stable.
When you mist, don’t spray the roots. Just keep the leaves wet. The moisture will evaporate through the leaflets and this can also cause brown spots or tips on the leaves.
Humidity should be kept above 50% if possible. You can also use other methods like adding a humidifier to the room your palm is in or moving it to a high humidity room (bathroom, kitchen, etc.)
Pruning
Areca should be trimmed often to keep the foliage neat and tidy.
Prune off any brown, or dead tips or leaflets. Trim them off as soon as you see them or else the plant will waste energy trying to grow them.
You can get rid of any weak leaves so it can redirect its energy to new foliage. If you don’t trim your palm, it can stunt the growth or grow very slowly. Remove any damaged fronds or canes.
Their attractive, tall clumping palms have golden trunks that look like bamboo trunks. Some people even use them as privacy plants like cotoneaster.
Don’t trim yellow canes
Don’t trim any slightly yellow leaves, as they may correct themselves over time.
Some canes may appear to be slightly yellow but will turn green when the underlying reason is corrected (overwatering, too much light, or plant food excess).
You can peel off a small piece of the outer layer around each cane to check on it.
If the inside is dark green, then it’s doing fine and will likely correct itself.
If the inside is brown or dark in color, then it should be completely cut off from the plant.
Remove the cane by using sterile scissors or a knife and carefully excise it from the base of the plant.
How often should you water?
Keep to a schedule for your plant watering. The plants need plenty of water because of their subtropic origins.
But at the same time, you don’t want to waterlog your plant. As mentioned earlier, you should have a container with plenty of drainage and multiple drain holes.
The container should be placed over a saucer to collect all the water runoff so it doesn’t get all over your carpet or tile.
When you first plant it, you’ll want to water it generously the first few times.
Reduce watering after a week or so to resume the normal watering regimen. Allow soil to dry between waterings to just the first inch of soil.
But don’t let it go completely dry. The water should be damp, but not anything more.
Distilled water should be the ideal choice as areca palms are sensitive to compounds such as those added to municipal water sources. Avoid fluoridated water.
Use distilled water or rainwater for the best results. These plants just need a bit of TLC to shine for you.
Repotting
Every few years, you’ll need to transplant your palm to a bigger or deeper pot. This only is necessary if the pot you used is too small.
An easy way to check is to lift the palm by the roots and see if they’re brushing up against the edges of the container and bunching. Transplant it to a larger container if so following the steps above.
The clumped roots will help keep the size in control, but you’ll want to repot just to replace the old soil and remove plant food or water deposits that built up over time.
Builder’s sand amendment can help keep the soil clean.
Moving it to a larger container is also crucial for restoring nutrients in the soil.
When you replant it, you also use a new substrate packed with nutrients for the plant to absorb all over again.
A container only a few inches larger than the previous one will do fine. This will also get rid of dense buildup in the soil and at the bottom of the pot.
Fertilizer salts and hard water may be building up to dangerous concentrations.
You can examine the spent soil when you go through this process to see if you need to adjust your fertilizer dosage or frequency. Or if you need to switch to distilled water.